hola! happy may! okay so it's been awhile since i've done a design tutorial post, huh? i recently stopped helping with custom blog work because it was getting really overwhelming. some people were really fun to work with, others not so much. and when they'd argue with me about prices (to which i'd say well i can send you the link to a tutorial and you can do it if you want.. they wouldn't) or sometimes it felt like they were breathing down my neck.. gah! i guess that's not my calling. to those of you who allowed me to help create your online space special, thank you! and to the sweet girl who i had to hand off to someone else because my life was like dlf;adgha;fihal;skjriehgn!!! i'm really sorry. i hope you got everything you wanted!
so here we are. and here i am only because i've been helping my sister redo her blog and while in the middle of it i was fixing the post footer stuff and i thought, this is something that people might want to know. at least i hope it is haha. sometimes my mind gets excited over simple things and i want to share with the world and the world is like NO. okay lets get started.
your post footer details << not even sure that's the legit name for them, are like your comments, 'posted by', date & time, labels, etc.. and in blogger templates they are always defaulted to the left. and the font is small and boring. and when i was helping with blogs, i'd always ask my clients if they wanted that fixed and most said yes. i had like 2 say no. so i guess it's not boring to some ha.
how to fix this is really easy. especially because i'm not going to make you go into your template html and fiddle with it there, we'll just integrate everything into your css. woot woot!
head to your blogger dashboard >> template >> customize
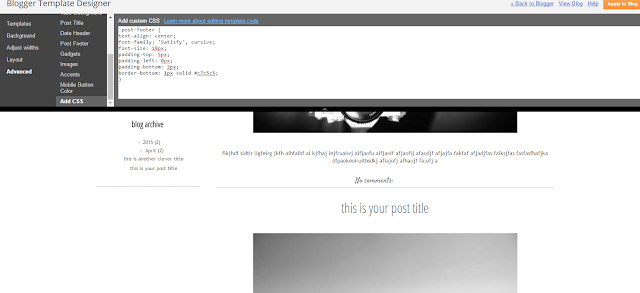
once you're in your blogger template designer go to advanced >> add css
once you've got your css open, copy and paste the code below into it. then press enter.
you'll notice that once you press enter, things change. the comment section is automatically moved to center, there is a center separation line "border", and the font is changed.
now.. to change the
font, you need to replace the
font-family: 'Satisfy', cursive; with your font. (to find your css code for this, go to google fonts >> find a font >> copy the css code and replace. easy! if you need more information about this go to
this post)
yea so the highlighted section is where you want to put your own font. the rest of the stuff is also game to customize as you please! play with it and see what you can come up with. you can change the font, the size, the border at the bottom, padding, the color from the color wheel
here.. tip: if you want to change the border type, use either
solid, dotted, dashed or
none.
as always, hit apply to blog and you're done!
if you have any questions, email me and i will be more than happy to help you out!


Thank you Emily. You are a life saver.
ReplyDelete